
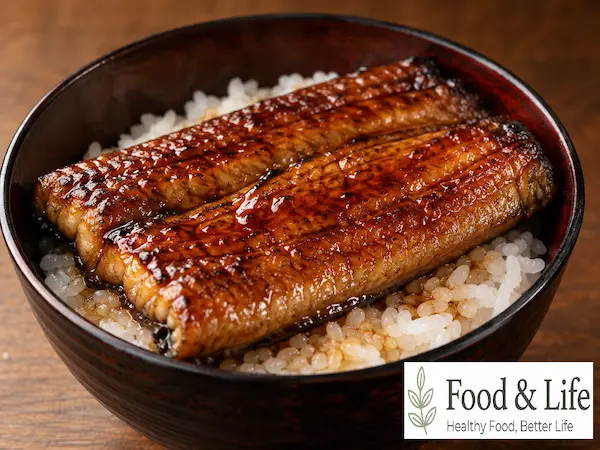
If you want to make a tender Japanese-style eel rice bowl at home, a great method is to first sear the eel, then steam it slowly with Cheongha before coating it in a glossy tare sauce.
This Japanese unadon recipe starts with 1 whole freshwater eel, seared over medium heat for 3 minutes per side. The eel is then sprinkled with 2 tablespoons of Cheongha, wrapped tightly in foil, and gently steamed over low heat for 40–50 minutes. The tare is made by briefly boiling 2 tablespoons sugar, 2 tablespoons mirin, and 3 tablespoons soy sauce, then coating the tender eel until glossy. The result is moist, delicate eel paired with a sweet and savory sauce over warm white rice.
⏱️ Cooking Time: About 60 minutes
🍳 Difficulty: ★★★☆☆
✓ Ingredients (2 Servings)
🥣 Main Ingredients
- 1 whole freshwater eel, about 450 g (15.9 oz)
- Cooked white rice, as needed
🧂 Sauce & Seasonings
- Cooking oil, as needed
- 2 tbsp Cheongha
- 2 tbsp sugar
- 2 tbsp mirin
- 3 tbsp soy sauce
(Measurement guide: 1 tbsp = 15 ml, 1 tsp = 5 ml, 1 paper cup = 180 ml / 6.1 fl oz)
✓ How to Make Japanese Unadon
- Dry the eel: Pat 1 cleaned freshwater eel, about 450 g (15.9 oz), thoroughly dry with paper towels.
- Cut the eel to fit the pan: Cut the eel into pieces that fit comfortably in the pan you will be using.
- Prepare the surface: Use a knife to remove any remaining slippery residue from the skin side. Make shallow cuts in the firm skin, then score the flesh lengthwise as well.
- Sear the flesh side: Heat a pan over medium heat and add an appropriate amount of cooking oil. Place the eel flesh-side down and cook for 3 minutes. As the eel contracts and begins to curl, gently press it with a spatula or tongs to keep it as flat as possible.
- Cook the skin side: Flip the eel and cook the skin side over medium heat for another 3 minutes. Remove it from the pan.
- Add Cheongha and wrap: Place the seared eel on aluminum foil and evenly sprinkle 2 tablespoons of Cheongha over it. Wrap the foil securely so the moisture cannot escape.
- Steam until tender: Place the foil-wrapped eel in a pan and add enough water to come about halfway up the side of the pan. Cover with a lid. Bring the water to a boil over high heat, then reduce to low heat and steam for 40–50 minutes. After 40 minutes, check the tenderness every 5 minutes.
- Make the tare sauce: While the eel is steaming, add 2 tablespoons sugar, 2 tablespoons mirin, and 3 tablespoons soy sauce to a pan. Heat while stirring until the sugar dissolves. Once the sauce comes to a boil, remove it from the heat.
- Coat the steamed eel with tare: Carefully remove the fully tender eel from the foil and place it in the pan with the tare. Cook over medium heat, gently turning the eel so the sauce coats both sides evenly.
- Season the rice with tare: Divide the cooked rice between serving bowls and drizzle an appropriate amount of tare over the rice.
- Top with the eel: The finished eel will be extremely tender and can break apart easily. Use a wide spatula underneath and tongs for support as you carefully transfer it onto the rice. Brush or spoon a little more of the remaining tare over the surface for a glossy finish.
✓ Key Tips for Success
- Keep the eel from curling during the initial sear. Eel contracts as it cooks, which can cause the edges to curl upward. While cooking the flesh side, gently press it down with a spatula to keep it as flat as possible. This helps the eel maintain an even shape during steaming and glazing.
- Handle the steamed eel very gently. After steaming for 40–50 minutes, both the flesh and skin become extremely tender and can easily fall apart when coated with tare or transferred to the serving bowl. Support the eel from underneath with a wide spatula and use tongs only as light assistance.
✓ Serving Tips
- Steaming time can vary depending on your heat level. After 40 minutes, check the eel every 5 minutes and stop steaming once it reaches your preferred tenderness.
- Drizzle tare over the rice before adding the eel so the sweet and savory sauce can soak naturally into the rice.
- After placing the eel on top, brush or spoon a little of the remaining tare over the surface to enhance its glossy appearance and sauce flavor.
✓ How to Choose Good Freshwater Eel
- Check the color of the back: Freshwater eel may have a grayish-black, brown, or deep green color along the back.
- Check the surface: Choose eel with a smooth, moist-looking surface rather than flesh or skin that appears dry or rough.
- Check the eyes: If buying a whole eel, choose one with clear rather than cloudy eyes.
✓ Freshwater Eel Nutrition per 100 g (3.5 oz)
| Nutrient | Amount per 100 g (3.5 oz) |
|---|---|
| Calories | 223.00 kcal |
| Carbohydrates | 0.30 g |
| Protein | 14.40 g |
| Fat | 17.10 g |
| Sodium | 65.00 mg |
Values are based on 100 g (3.5 oz) of raw freshwater eel. Actual nutrition may vary depending on the size of the eel, farming conditions, and cooking method.
Source: Ministry of Food and Drug Safety K-FIND Food Nutrition Database
✓ Frequently Asked Questions (FAQ)
Q1. How long should I steam the eel after searing it?
Once the water comes to a boil, steam the seared eel over low heat for 40–50 minutes. Because heat levels vary, begin checking every 5 minutes after the 40-minute mark and stop once the flesh is sufficiently tender.
Q2. Why does the eel fall apart when I coat it with tare?
After a long steaming time, the flesh and skin become extremely tender and can break easily if handled roughly. Support the entire piece with a wide spatula and use tongs gently when turning it.
Q3. Can I use regular soy sauce instead of brewed soy sauce for the tare?
Yes. Regular soy sauce can be used instead. However, saltiness and flavor can vary between types and brands of soy sauce, so check the characteristics of the product you are using.
Finished Japanese unadon has a glossy layer of tare coating the surface of the eel, making it immediately appetizing. Because the eel is first seared and then steamed slowly with Cheongha, the flesh becomes moist and tender enough to separate easily with chopsticks or a spoon. The tare made with soy sauce, mirin, and sugar balances sweetness and saltiness while complementing the rich, savory flavor of the eel.
Drizzling the tare over the rice before adding the eel also allows the sauce to soak into the grains, so the rice and eel taste naturally connected rather than like separate components. The golden-brown eel and deep brown glossy sauce create the clean, inviting appearance of a classic Japanese rice bowl.
When I made this at home, the process took longer than simply grilling the eel directly with sauce because of the additional steaming step, but the technique itself was not difficult. I prefer eel that is soft enough to almost melt apart rather than firm and chewy, so I especially liked the texture created by the extended steaming.
The tare is also simple to prepare with just soy sauce, mirin, and sugar, making it easy to cook while the eel is steaming. The only step that requires extra care is turning the tender eel in the tare pan at the end. Moving it slowly helps prevent the flesh from breaking apart and keeps the finished pieces looking neat.
My family also enjoyed the moist, tender texture of the eel and the way the sweet and savory tare soaked into the rice. Since you can enjoy the eel and seasoned rice together in every spoonful, it makes a satisfying meal even without many side dishes.
If you want to make a tender Japanese eel rice bowl at home, try this method of searing, steaming, and then glazing the eel with tare. It takes a little extra time, but the combination of delicate eel, glossy sauce, and warm rice makes this unadon well suited for sharing with family.
Save or bookmark this recipe so you can easily find it again, and share it with someone who enjoys Japanese food.
I’ll continue sharing approachable recipes and practical cooking tips that are easy to make at home. 😊
If there is a dish you have been curious about or a recipe you would like to see next, feel free to leave a comment. 😊
※ This recipe was prepared after referring to a recipe introduced by the YouTube channel ‘일식예보’, and this post is based on the cooking process and results.