
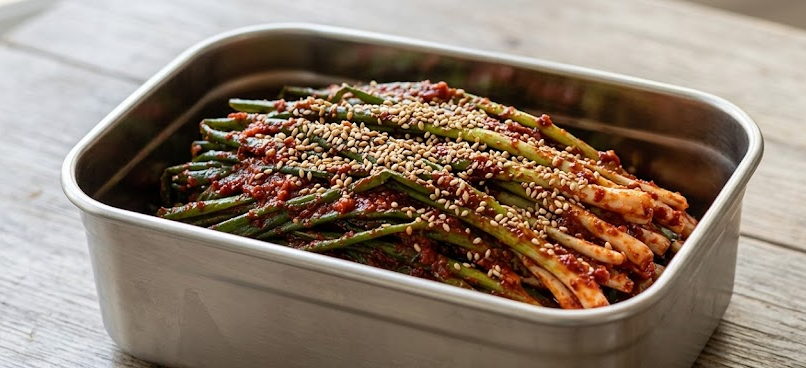
Pa Kimchi (Korean green onion kimchi) is a crisp, pungent side dish that pairs especially well with steamed white rice, grilled pork belly, or a hot bowl of ramen.
The key to this pa kimchi recipe is soaking the firm white ends of the scallions in anchovy fish sauce for 20 minutes first, then blending that same fish sauce with pear and onion to make the seasoning. There is no need to prepare a separate glutinous rice paste, which keeps the process simple while allowing the mild sweetness of pear and onion and the savory depth of the fish sauce to coat the scallions evenly.
Enjoy it freshly mixed for its crisp texture and sharp scallion flavor, or let it ferment for a deeper, tangier taste.
⏱️ Cooking Time: About 35 minutes
🍳 Difficulty: ★★☆☆☆
✓ Ingredients
🥣 Main Ingredients
- 1 bunch jjokpa (Korean small green onions/scallions)
- 1/2 pear
- Onion, the same amount as the pear
🧂 Seasonings & Sauce
- 15 tbsp anchovy fish sauce
- 3 tbsp minced garlic
- 1 tbsp minced ginger
- 2 tbsp maesil extract (Korean green plum syrup)
- 3 tbsp sugar
- 15 tbsp gochugaru (Korean red pepper flakes)
- 1 tbsp Miwon (MSG), optional
- Sesame seeds
(Measurement guide: 1 tbsp = 15 ml (0.5 fl oz), 1 tsp = 5 ml (0.17 fl oz), 1 Korean paper cup = 180 ml (6.1 fl oz))
✓ How to Make Pa Kimchi
- Salt the scallion ends with fish sauce: Wash 1 bunch of jjokpa thoroughly and remove as much moisture as possible. Pour 15 tbsp anchovy fish sauce evenly over the firm white ends and let them sit for about 20 minutes.
- Blend the pear and onion base: Add 1/2 pear and an equal amount of chopped onion to a blender. Pour in all of the anchovy fish sauce used to season the scallions, then blend until smooth.
- Make the kimchi seasoning: Pour the blended pear and onion mixture into a large bowl. Add 3 tbsp minced garlic, 1 tbsp minced ginger, 2 tbsp maesil extract, 3 tbsp sugar, 15 tbsp gochugaru, and 1 tbsp Miwon. Mix thoroughly until smooth and evenly combined.
- Coat the white ends first: Let the seasoning sit briefly until the gochugaru absorbs some of the moisture and the mixture thickens slightly. Take a small amount of seasoning and spread it evenly over the white ends of the scallions first.
- Season the green leaves: Use the remaining seasoning to gently coat the tender green parts of the scallions without squeezing or crushing them. Finish with a sprinkling of sesame seeds.
- Pack and ferment: Arrange the finished pa kimchi neatly in a storage container. Leave it at room temperature for about half a day, then refrigerate and serve chilled.
✓ Key Tips for Success
- Dry the scallions thoroughly: If too much water remains after washing, the seasoning may not cling well and the kimchi can become overly watery or soft during fermentation. Drain the scallions thoroughly before adding the fish sauce.
- Season the white ends first: The white ends are thicker and firmer than the green leaves, so they need more time to absorb the seasoning. Soaking them in anchovy fish sauce first helps season the scallions more evenly without making the tender leaves excessively salty.
✓ Serving Tips
- Serve with jajang ramen or grilled pork belly: Wrap the pa kimchi around bites of sweet-savory jajang ramen or crispy grilled pork belly for a fresh, pungent contrast to the richer flavors.
- Using Miwon: If you want a more pronounced savory flavor, add the optional 1 tbsp Miwon listed in the recipe.
- Adjust the fermentation: Enjoy the kimchi immediately for a spicy, crisp, and pungent fresh-kimchi flavor, or leave it at room temperature for one day before refrigerating if you prefer a more fermented, tangy taste.
✓ How to Choose Fresh Jjokpa
- Check the white stems: Choose scallions with white lower stems that are not overly thick, grow relatively straight, and are fairly even in length.
- Look at the leaves: Fresh jjokpa should have firm, resilient, deep-green leaves without yellow or dried tips.
- Check the thickness: Scallions with an even thickness throughout and no soft or mushy sections are better suited for making kimchi.
✓ Jjokpa Nutrition per 100 g (3.5 oz)
| Nutrient | Amount per 100 g (3.5 oz) |
|---|---|
| Calories | 26.00 kcal |
| Carbohydrates | 5.80 g |
| Protein | 1.69 g |
| Fat | 0.17 g |
| Sodium | 1.00 mg |
Based on 100 g of raw jjokpa. Actual nutrition values may vary depending on the variety, part used, product, and preparation method.
Source: Ministry of Food and Drug Safety Food Nutrition Database – Raw Food Ingredients
✓ Frequently Asked Questions (FAQ)
Q1. Why do you pour the anchovy fish sauce over only the white ends of the scallions first?
The white ends are thicker and firmer than the green leaves, so they take longer to absorb seasoning. Letting them sit in anchovy fish sauce for 20 minutes first helps soften and season them evenly without making the tender leaves overly salty.
Q2. Why does the pa kimchi seasoning become watery after it is made?
This can happen if the washed scallions were not dried thoroughly or if the kimchi was mixed before the gochugaru had enough time to absorb moisture from the pear-and-onion seasoning. Drain the scallions well and let the seasoning sit briefly until it thickens before coating the scallions.
Q3. Can pa kimchi ferment properly without glutinous rice paste?
Yes. The sugars naturally present in the pear and onion help support fermentation even without glutinous rice paste. Leaving out the rice paste also keeps the seasoning less heavy and gives the finished kimchi a cleaner finish.
Using the seasoning ratios in this recipe, the savory anchovy fish sauce works well with the gentle sweetness of the pear and onion, softening the naturally sharp flavor of the scallions. Soaking the white ends in fish sauce for 20 minutes also helps the thicker parts absorb the seasoning while the green leaves remain pleasantly crisp.
Because there is no need to make a separate glutinous rice paste, this easy pa kimchi recipe is relatively straightforward even if you are making green onion kimchi for the first time. If you are looking for homemade kimchi to serve with freshly cooked rice, grilled pork belly, or ramen, give this version a try.
Save or bookmark this recipe so you can easily find it again, and share it with someone who enjoys Korean food.
More easy-to-follow recipes and practical cooking tips will be added regularly. 😊
If there is a dish you are curious about or would like to see featured, feel free to leave a comment. 😊