
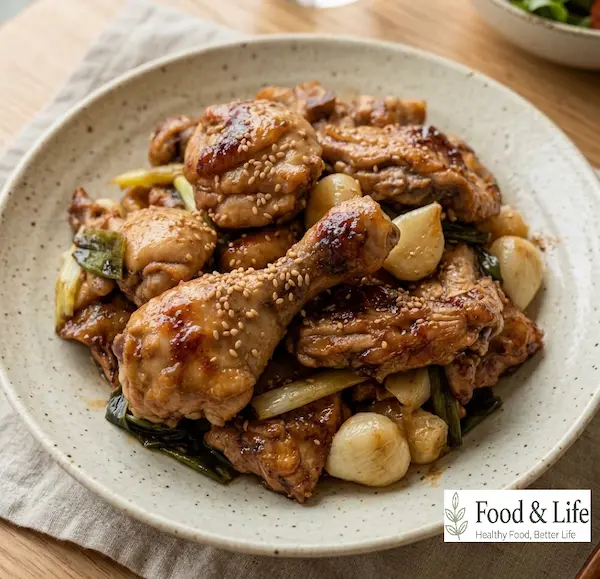
This Galbi Chicken recipe from actor Ryu Soo-young is an easy one-pan Korean chicken dish made by searing 1 kg (2.2 lb) of cut-up chicken skin-side down without any added oil, then seasoning it with soy sauce, oyster sauce, and Korean cooking syrup. The entire dish comes together in one pan in about 25 minutes.
The key is to place the chicken skin-side down in a well-preheated skillet and leave it untouched for the first 3 minutes so enough fat renders naturally from the skin. After that, cook it over medium heat so the outside becomes nicely browned while the meat stays moist and tender without deep-frying.
The chicken is first coated with 1 tbsp sugar, then 3 tbsp soy sauce is bubbled in an open area of the pan to deepen its flavor. A heaping tablespoon of oyster sauce and 6 tbsp Korean cooking syrup are added to create a glossy, sweet-and-savory galbi-style sauce. Finish by covering the pan and cooking over low heat for 5 minutes so the sauce thoroughly coats the chicken.
⏱️ Cooking Time: About 25 minutes
🍳 Difficulty: ★★☆☆☆
✓ Ingredients
🥣 Main Ingredients
- 1 kg (2.2 lb) cut-up chicken, Korean size No. 10
- 2 green onions
- 1 handful garlic cloves
- 1 piece ginger
🧂 Seasonings & Sauce
- 3 pinches salt
- 1 tbsp sugar
- 3 tbsp soy sauce
- 1 heaping tbsp oyster sauce
- 6 tbsp Korean cooking syrup (mulyeot)
- Sesame seeds
(Measurement guide: 1 tbsp = 15 ml, 1 tsp = 5 ml, 1 Korean paper cup = 180 ml / 6.1 fl oz)
✓ How to Make Galbi Chicken
- Prep and dry the chicken: Trim off the wing tips from the 1 kg (2.2 lb) cut-up chicken with kitchen scissors and snip the Achilles tendons on the drumsticks. Rinse the chicken briefly under running water to remove any impurities, then pat it thoroughly dry with paper towels. Cut the 2 green onions diagonally into 4–5 cm (1.6–2 inch) pieces and thinly slice the ginger.
- Sear over high heat: Preheat a skillet thoroughly over high heat without adding oil. Place the chicken skin-side down, sprinkle evenly with 3 pinches of salt, and cook for 3 minutes without moving the pieces.
- Flip and cook over medium heat: Reduce the heat to medium and flip each piece of chicken. Cover the pan and cook for 3 minutes so the heat begins to penetrate the meat.
- Add ginger and continue cooking: Add the sliced ginger, cover again, and cook for another 10 minutes. Turn the chicken occasionally to prevent burning, and gently scrape up any browned bits stuck to the bottom of the skillet with a spatula.
- Add the vegetables: Add 1 handful of garlic cloves and the sliced green onions. Stir-fry them in the flavorful chicken fat until the vegetables begin to soften.
- Coat with sugar: Sprinkle 1 tbsp sugar evenly over the chicken and toss well so the surface is coated with sweetness before the other sauces are added.
- Cook the soy sauce for extra flavor: Push the chicken and vegetables to one side of the skillet. Pour 3 tbsp soy sauce into the empty space and let it bubble vigorously until it lightly caramelizes, then mix everything together evenly.
- Add oyster sauce and cooking syrup: Add 1 heaping tbsp oyster sauce and 6 tbsp Korean cooking syrup (mulyeot). Stir quickly until the sauce thickly coats the chicken and gives it a glossy finish.
- Finish over low heat: Reduce the heat to low, cover, and let the chicken cook for 5 minutes. Transfer to a serving plate and finish generously with sesame seeds.
✓ Key Tips for Success
- Dry the chicken completely and do not move it for the first 3 minutes: If moisture remains on the surface, the chicken will steam instead of browning, and the skin will lose its crisp texture. Pat the chicken thoroughly dry with paper towels, place it skin-side down in a well-preheated skillet without oil, and leave it untouched for the first 3 minutes. This allows enough chicken fat to render and helps the skin brown properly.
- Control the heat after adding the sauce: Sugar, Korean cooking syrup, and soy sauce can burn very quickly over high heat. Once the vegetables and seasonings have been added, keep the heat around medium-low and gently scrape the bottom of the pan as the sauce reduces. Finish over low heat for 5 minutes and avoid extending the cooking time unnecessarily so the chicken stays moist rather than becoming dry.
✓ Serving Tips
- Spoon the sweet-and-savory sauce, roasted garlic cloves, and green onions over hot white rice for an easy Korean-style chicken rice bowl.
- For a cleaner spicy finish, thinly slice 1–2 Cheongyang chili peppers and stir them in during the final stage of cooking.
- Serve with sweet-and-sour Korean pickled radish, often served with fried chicken, or a thinly shredded cabbage salad to balance the richness of the sauce.
✓ How to Choose Good Chicken
- Skin color and appearance: Choose chicken with moist, glossy skin and an overall pale apricot or light pink color. The cut surfaces around the neck or ankle area should have a reddish tone.
- Firm texture: When lightly pressed with a finger, the meat should spring back quickly and feel firm rather than soft or mushy.
- Storage and packaging: Choose chicken stored refrigerated at 5°C (41°F) or below with minimal liquid loss. Avoid packages with excessive blood or liquid pooled inside, and select chicken with a fresh smell.
Source: National Institute of Animal Science, Rural Development Administration
✓ Chicken Nutrition per 100 g (3.5 oz)
| Nutrient | Amount per 100 g (3.5 oz) |
|---|---|
| Calories | 118.00 kcal |
| Carbohydrates | 0.20 g |
| Protein | 22.00 g |
| Fat | 2.60 g |
| Sodium | 63.00 mg |
Values are based on 100 g (3.5 oz) of raw native Korean chicken. Actual nutrition may vary depending on the breed, cut, product, and cooking method.
Source: Ministry of Food and Drug Safety Food Nutrition Database
✓ Frequently Asked Questions (FAQ)
Q1. Do I need to add cooking oil when searing the chicken?
No. Enough fat renders naturally from the chicken skin, so additional cooking oil is not necessary. Make sure the skillet is thoroughly preheated over high heat, place the chicken skin-side down, and do not move it for the first 3 minutes so the skin does not tear.
Q2. Why does the chicken burn so easily after I add the sauce?
The sugar in the sugar, soy sauce, and Korean cooking syrup can burn very quickly when exposed to high heat. After adding the seasonings, keep the heat at medium-low, gently scrape the bottom of the skillet, and finish by cooking covered over low heat for 5 minutes. Keeping the total cooking time around 25 minutes helps the chicken stay moist without burning the sauce.
Q3. Can I replace all of the Korean cooking syrup with sugar or oligosaccharide syrup?
The thick texture and glossy coating created by Korean cooking syrup are difficult to reproduce exactly with sugar or oligosaccharide syrup alone. For the sticky, shiny finish and sweet-and-savory galbi-style flavor of the original recipe, it is best to use the full amount of Korean cooking syrup specified.
Patting the chicken completely dry and searing it skin-side down without added oil allows the chicken’s own fat to brown the outside while keeping the meat moist. Leaving it untouched for the first 3 minutes, then lowering the heat to medium, helps create nicely browned skin and tender meat without frying.
Coating the chicken with sugar first, bubbling the soy sauce separately in the skillet, and then adding oyster sauce and Korean cooking syrup gives the chicken a rich, sweet-and-savory galbi-style glaze with an appetizing shine. The roasted green onions and whole garlic cloves also absorb the sauce and pair especially well with hot steamed rice.
The two most important steps in Ryu Soo-young’s Galbi Chicken recipe are leaving the chicken untouched for the first 3 minutes and lowering the heat after adding the sauce. Follow those steps and you can make tender, glossy one-pan Korean chicken without burning the sugary glaze. It is a great option when you want a hearty family dinner without ordering fried chicken.
Save or bookmark this recipe so you can easily find it later, and share it with someone who enjoys Korean food.
More easy-to-follow recipes and practical cooking tips will be shared regularly. If there is another Korean dish or recipe you would like to see, feel free to leave a comment.