
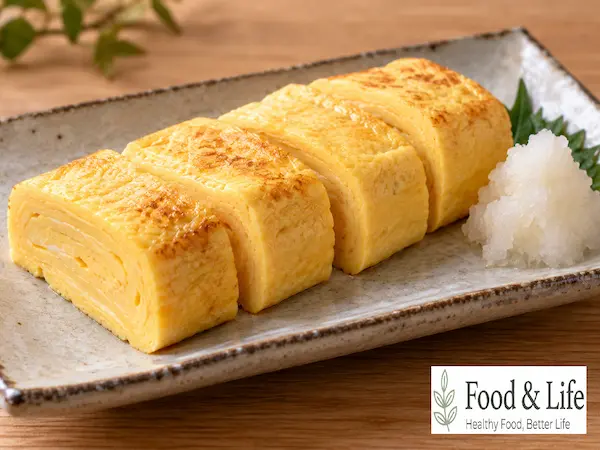
If you want a Japanese rolled omelet that stays soft, moist, and fluffy, mixing the eggs with dashi and rolling them in thin layers is the key.
This Dashimaki Tamago recipe uses 60 ml (2 fl oz / 1/4 cup) of water mixed with dashi powder, then combines it with 4 eggs, Korean soup soy sauce, mirin, and sugar. Straining the egg mixture creates a smoother texture, while cooking it in roughly five portions helps build delicate, moist layers. For the first layer, gently stir the eggs while they are still partially set and gather them to one side of the pan. Continue adding thin layers of oil and egg mixture, rolling each layer while it is still slightly undercooked. Shaping the finished omelet in plastic wrap while it is hot gives it a neat rectangular form while keeping the inside tender and fluffy.
⏱️ Cooking Time: About 20 minutes
🍳 Difficulty: ★★★☆☆
✓ Ingredients (2 Servings)
🥣 Main Ingredient
- 4 eggs
🧂 Seasonings
- 60 ml (2 fl oz / 1/4 cup) water
- 1/2 tsp dashi powder
- 1/2 tsp Korean soup soy sauce (guk-ganjang)
- 1 tsp mirin
- 1/2 tsp sugar
- Neutral cooking oil, as needed for coating the pan
(Measurement guide: 1 tbsp = 15 ml, 1 tsp = 5 ml, 1 Korean paper cup = 180 ml / 6.1 fl oz)
✓ How to Make Dashimaki Tamago
- Make the dashi: Add 1/2 tsp dashi powder to 60 ml (2 fl oz / 1/4 cup) water. Stir thoroughly until no lumps remain.
- Beat the eggs: Crack 4 eggs into a bowl and whisk until the yolks and whites are evenly combined.
- Season the egg mixture: Add the prepared dashi, 1/2 tsp Korean soup soy sauce, 1 tsp mirin, and 1/2 tsp sugar. Mix until evenly combined.
- Strain the eggs: Pour the egg mixture through a fine-mesh strainer once to remove the chalazae and any unmixed egg white. This creates a smoother egg mixture.
- Prepare the plastic wrap: Lay a sheet of plastic wrap on a cutting board so you can shape the omelet immediately after cooking.
- Preheat the pan: Lightly coat the entire surface of a rectangular tamagoyaki pan with cooking oil and heat it. Dip the tip of a chopstick into the egg mixture and touch it to the pan. When it makes a gentle sizzling sound, the pan is ready.
- Cook the first layer: Pour about 1/5 of the egg mixture into the pan. Once partially set, gently stir it with chopsticks to create a soft texture, then gather the egg toward one side of the pan.
- Add the second layer: Lightly oil the empty part of the pan again and pour in another 1/5 of the egg mixture. Lift the cooked egg slightly so the fresh egg mixture can flow underneath it.
- Remove bubbles and roll: Pop any bubbles that appear on the surface with chopsticks. When the new layer is partially set but still moist, roll the cooked egg toward the opposite side of the pan.
- Repeat with the remaining egg mixture: Each time you add more egg, lightly coat the pan with oil. Continue adding the remaining mixture in roughly 1/5 portions and roll each layer while it is still partially set.
- Shape the omelet: Once all the egg mixture has been cooked and rolled, immediately transfer the hot omelet onto the prepared plastic wrap. Wrap it firmly and shape it into a neat rectangle. Leave it wrapped as it cools so the shape sets.
- Slice and serve: Remove the shaped Dashimaki Tamago from the plastic wrap and cut it into slices of your preferred thickness.
✓ Key Tips for Success
- Check the pan temperature before adding the eggs: If the pan is not hot enough, the eggs are more likely to stick. If it is too hot, the egg mixture can set too quickly and become difficult to roll. Touch a small amount of egg mixture to the pan with a chopstick and begin once you hear a gentle sizzle.
- Roll the eggs while they are still partially set: If each layer is cooked until completely firm before rolling, the layers may not bond naturally and the omelet can become dry or tough. Roll while the surface is still moist, and pop any bubbles with chopsticks to keep the texture smooth.
✓ Serving Tips
- Straining the egg mixture once removes the chalazae and any unmixed egg white, giving the finished omelet a smoother, softer cross-section.
- Shape the omelet with plastic wrap while it is still hot. As it cools, the rectangular shape will set more naturally and evenly.
- Instead of pouring in all the egg mixture at once, divide it into roughly five portions. Building the omelet one layer at a time creates the characteristic soft, moist layers of Dashimaki Tamago.
✓ How to Choose Fresh Eggs
- Check the shell surface: Choose eggs with clean, firm shells and an even surface without visible debris.
- Check for movement inside: Gently shake the egg. Choose one with minimal movement or sloshing inside.
- Check the shell markings: Check the four-digit laying date, producer identification number, and housing-system number printed on the shell. When possible, choose eggs with a more recent laying date.
Source: Korea Policy Briefing · Ministry of Food and Drug Safety – How to Check Egg Freshness
✓ Egg Nutrition per 100 g (3.5 oz)
| Nutrient | Amount per 100 g (3.5 oz) |
|---|---|
| Calories | 140.00 kcal |
| Carbohydrates | 1.07 g |
| Protein | 12.86 g |
| Fat | 8.51 g |
| Sodium | 137.00 mg |
Values are based on 100 g (3.5 oz) of raw egg. Actual nutrition may vary depending on the variety, product, and cooking method.
Source: Ministry of Food and Drug Safety Food Nutrition Database – Raw Egg
✓ Frequently Asked Questions (FAQ)
Q1. How do I know when the pan is hot enough for Dashimaki Tamago?
Dip the tip of a chopstick into the egg mixture and touch it to the pan. If you hear a gentle sizzling sound, the pan is ready. Checking the temperature before pouring in the eggs helps prevent sticking and keeps the eggs from cooking too quickly.
Q2. Why is my Dashimaki Tamago dry and why don’t the layers stick together?
Cooking each egg layer for too long removes moisture and makes it harder for the next layer to bond with it. Roll each layer before it fully sets, while the surface is still slightly moist.
A finished Dashimaki Tamago has a neat exterior with multiple soft, moist egg layers visible when sliced. The dashi mixed into the eggs gives it a softer and more tender texture than a typical rolled omelet. The savory depth of the dashi and Korean soup soy sauce is balanced by the mild sweetness of sugar and mirin, creating a gentle flavor that is neither overly salty nor overly sweet.
The outside develops a light golden color while the inside stays fluffy and layered. Each bite combines a moist texture with subtle dashi flavor, which is one of the defining characteristics of this Japanese rolled omelet.
When I made this recipe, dividing the egg mixture into roughly five portions instead of cooking it all at once made a noticeable difference in the final texture. Rolling several layers may look complicated at first, but the same basic motion is repeated each time, so it becomes much easier once you get used to the process.
I prefer rolled omelets that are soft and fluffy rather than firm, so I especially enjoyed the texture created by adding dashi. Wrapping and shaping the omelet while it was still hot also gave the slices a cleaner, more even appearance. My family liked the soft texture and subtle umami flavor, especially because the seasoning was neither too salty nor too sweet. It is a dish I would make again both as a simple side dish and whenever I want to serve something neat and elegant.
If you often make rolled eggs but want to try a softer and more moist Japanese-style version, give this Dashimaki Tamago recipe a try. With just 4 eggs and a few basic seasonings, it works well as a side dish with rice or as part of a light meal.
Save or bookmark this recipe so you can easily find it again, and share it with anyone who enjoys Japanese home cooking.
I’ll continue sharing approachable recipes and practical cooking tips that are easy to follow at home. 😊
If there is a dish you have been curious about or a recipe you would like to see next, feel free to leave a comment. 😊
This recipe was prepared after referring to a recipe introduced by the YouTube channel ‘일식예보’, and this post was written based on my own cooking process and results.