
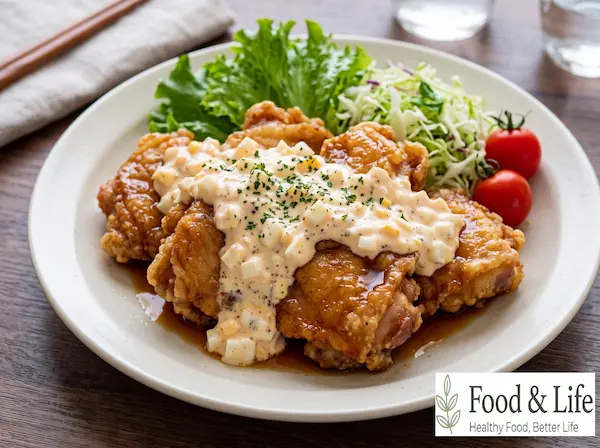
If you love Japanese fried chicken, Chicken Nanban is a delicious way to enjoy crispy chicken with a sweet and tangy sauce. The key is balancing the golden egg-coated crust with the savory nanbanzu sauce and creamy homemade tartar sauce.
This chicken nanban recipe starts with chicken thighs coated in flour and beaten egg, then fried at 170°C (338°F) until golden brown. The fried chicken is dipped in a sweet and tangy nanbanzu sauce made with soy sauce, vinegar, and sugar. A generous topping of homemade tartar sauce, prepared with hard-boiled eggs, finely chopped onion, and mayonnaise, adds a rich, creamy finish.
Originally associated with Miyazaki Prefecture in Japan, Chicken Nanban combines tender, juicy chicken with a flavorful coating, refreshing acidity, and creamy tartar sauce. It’s a satisfying Japanese home-style dish that pairs especially well with steamed white rice.
⏱️ Cooking Time: About 30 minutes
🍳 Difficulty: ★★☆☆☆
✓ Ingredients (1–2 Servings)
🥣 Main Ingredients
- About 300 g (10.6 oz) chicken thigh meat
- 2 tbsp all-purpose flour
- 1 egg (for coating the chicken)
- 2 hard-boiled eggs (for the tartar sauce)
- 1/4 onion (for the tartar sauce)
🧂 Nanbanzu Sauce & Seasonings
- 2 tbsp guk-ganjang (Korean soup soy sauce)
- 2 1/2 tbsp vinegar
- 3 tbsp sugar
- 3 tbsp mayonnaise (for the tartar sauce)
- 1 tsp ketchup (for the tartar sauce)
- 1 pinch salt (for the tartar sauce)
- 1 pinch black pepper (for the tartar sauce)
- Cooking oil, as needed (for frying; no fixed amount)
(Measurement guide: 1 tbsp = 15 ml, 1 tsp = 5 ml, 1 Korean paper cup = 180 ml / 6.1 fl oz)
✓ How to Make Chicken Nanban
- Hard-boil the eggs for the tartar sauce: Bring a pot of water to a boil. Add 2 eggs and cook for 12 minutes until hard-boiled. Remove the shells and set the eggs aside.
- Finely chop the onion: Finely dice 1/4 onion and soak it in cold water for 10 minutes to reduce its sharp, pungent flavor. While the onion is soaking, prepare the nanbanzu sauce.
- Prepare the nanbanzu sauce: Combine 2 tbsp guk-ganjang (Korean soup soy sauce), 2 1/2 tbsp vinegar, and 3 tbsp sugar in a small saucepan. Heat the mixture until the sugar dissolves and the sauce comes to a boil. Turn off the heat and set the sauce aside.
- Drain the chopped onion thoroughly: Transfer the soaked onion to a strainer and drain well. Use paper towels to remove any remaining moisture. Thoroughly drying the onion prevents the tartar sauce from becoming too watery.
- Prepare the hard-boiled eggs: Separate the yolks and whites of the 2 hard-boiled eggs. Finely chop the egg whites with a knife, then place the yolks in a mixing bowl and mash them until smooth.
- Make the homemade tartar sauce: Add the chopped egg whites and drained onion to the bowl containing the mashed yolks. Mix in 3 tbsp mayonnaise, 1 tsp ketchup, 1 pinch salt, and 1 pinch black pepper. Stir until evenly combined, keeping small pieces of egg visible for a slightly chunky, creamy texture.
- Prepare the chicken thighs: Trim any thick pieces of excess fat or tough tendons from approximately 300 g (10.6 oz) chicken thigh meat. Spread the chicken out flat, keeping the pieces relatively thick rather than cutting them into small chunks. This helps preserve the chicken’s juicy texture during frying.
- Coat the chicken with flour: Place 2 tbsp all-purpose flour on a wide plate. Coat both sides of the chicken thighs evenly, pressing lightly with your hands so the flour adheres to the surface and reaches any folds in the meat.
- Dip the chicken in beaten egg: Crack 1 egg into a separate bowl and beat thoroughly. Dip the flour-coated chicken into the beaten egg, turning it over to ensure both sides are evenly covered.
- Fry the chicken at 170°C (338°F): Pour enough cooking oil into a frying pan for frying and heat it to approximately 170°C (338°F). Carefully place the egg-coated chicken thighs into the hot oil and begin frying until the surface develops a golden color.
- Flip and cook the other side: Fry the first side for approximately 3 minutes, then turn the chicken over and continue frying the opposite side until golden brown. Cooking time will vary depending on the thickness of the chicken, so make sure the center is completely cooked through before removing it from the oil.
- Drain the fried chicken: Once both sides are golden brown and the chicken is fully cooked, remove it from the oil. Place it on a wire rack or draining tray and let the excess oil drip off briefly.
- Coat the chicken with nanbanzu sauce: Transfer the drained fried chicken into the prepared nanbanzu sauce. Turn the chicken over several times, allowing the sweet and tangy sauce to thoroughly coat and soak into the egg-battered crust.
- Finish with homemade tartar sauce: Arrange the nanbanzu-coated chicken thighs on a serving plate. Spoon a generous amount of the prepared tartar sauce over the chicken. The Chicken Nanban is now ready to serve, combining a sweet and tangy glaze with a rich, creamy topping.
✓ Key Tips for Success
- Coat the chicken with flour before dipping it in egg: If the flour is not distributed evenly, the beaten egg may not adhere properly to the chicken, causing the coating to separate during frying. First, cover the entire surface of the chicken thighs with 2 tbsp flour. Then dip the flour-coated chicken into 1 beaten egg to create an even coating before frying.
- Maintain the correct oil temperature and cook the chicken thoroughly: If the oil temperature is too low, the coating may absorb too much oil and become greasy. If the temperature is too high, the outside may brown before the center is fully cooked. Begin frying at approximately 170°C (338°F), flip the chicken after about 3 minutes, and continue cooking until both sides are golden brown and the thickest part is completely cooked through.
✓ Serving Tips
- Coat freshly fried chicken with nanbanzu sauce: After draining the fried chicken, dip it evenly into the prepared nanbanzu sauce. The sweet and tangy seasoning soaks into the golden coating, creating a delicious combination of lightly crisp edges, savory flavor, and juicy chicken.
- Be generous with the tartar sauce: Spoon plenty of homemade tartar sauce over the chicken. The finely chopped hard-boiled eggs and onion provide texture, while the mayonnaise adds creaminess. The subtle sweetness and tanginess of the ketchup complement the acidity of the nanbanzu sauce.
- Serve with warm steamed rice: Chicken Nanban pairs particularly well with steamed white rice because of its rich tartar sauce and flavorful sweet-and-sour glaze. Cut the chicken into bite-sized pieces and enjoy it with rice for a satisfying Japanese-style meal.
✓ How to Choose Good Chicken Thighs
- Skin and meat color: Choose chicken thighs with skin that has a light peach color and a natural sheen. The meat should have a clear pink appearance rather than looking excessively pale or unusually dark.
- Firmness and texture: Fresh chicken thigh meat should feel firm and spring back when lightly pressed. Avoid chicken that feels excessively soft, mushy, or unusually loose in texture.
- Surface and packaging condition: Look for chicken with no severe bruising or discoloration on the skin. Avoid packages with excessive liquid or blood collected at the bottom. Chicken with an unusual odor or an excessively sticky surface should not be used.
✓ Chicken Thigh Nutrition per 100 g (3.5 oz)
| Nutrient | Amount per 100 g (3.5 oz) |
|---|---|
| Calories | 144.00 kcal |
| Carbohydrates | 0.00 g |
| Protein | 19.41 g |
| Fat | 7.67 g |
| Sodium | 84.00 mg |
Based on 100 g of raw chicken thigh meat. Actual nutritional values may vary depending on breed, cut, whether the skin is included, product, and cooking method.
Source: Food Safety Korea – Food Nutrition Database: Raw Chicken Thigh
✓ Frequently Asked Questions (FAQ)
Q1. What temperature should I fry chicken at for Chicken Nanban?
Fry the chicken thighs in oil heated to approximately 170°C (338°F). Cook the first side for about 3 minutes, then flip and fry the other side until golden brown, making sure the thickest part of the chicken is fully cooked before serving.
Q2. Why does the coating fall off my Chicken Nanban?
The coating can separate if the flour is unevenly distributed or the beaten egg does not adhere properly. To prevent this, coat the chicken thighs evenly with 2 tbsp all-purpose flour before dipping them into 1 beaten egg.
Q3. Can I make Chicken Nanban with chicken breast instead of chicken thighs?
Yes, chicken breast can be used, although the finished texture will be different. Because chicken breast contains less fat, avoid frying it longer than necessary, and cook it thoroughly while taking care to preserve its moisture.
The finished Chicken Nanban brings together golden-brown fried chicken, sweet and tangy nanbanzu sauce, and a generous topping of creamy homemade tartar sauce. The egg-battered coating has a delicate crispness, while the chicken thighs remain tender and juicy inside. The nanbanzu sauce, made with Korean soup soy sauce, vinegar, and sugar, provides a balanced combination of savory depth, refreshing acidity, and sweetness.
The homemade tartar sauce adds another layer of flavor and texture. Finely chopped hard-boiled eggs and onion give the sauce a slightly chunky consistency, while mayonnaise makes it smooth and creamy. A small amount of ketchup adds a subtle sweet-and-tangy note and a light pink tint. Spooned generously over the golden chicken, the tartar sauce makes the entire dish look especially appetizing.
What I particularly enjoy about Chicken Nanban is the contrast between the sweet-and-sour seasoning and the rich, creamy sauce. When I made this recipe, I kept the chicken thighs relatively thick before frying them and then dipped them in the prepared nanbanzu sauce. The flavorful coating absorbed the sauce, while the meat inside remained pleasantly moist.
Adding a spoonful of tartar sauce made with finely chopped eggs and onion softened the tanginess of the nanbanzu and created a combination that suited my taste especially well. My family also enjoyed the sweet-savory chicken with the creamy topping, particularly when served alongside warm steamed rice.
Preparing the tartar sauce with hard-boiled eggs and onion ahead of time made the cooking process easier to manage. Although the recipe includes several steps, the preparation was not as complicated as I initially expected. The chicken was especially satisfying when cut into bite-sized pieces and enjoyed with rice, allowing the savory coating and creamy sauce to come together in every bite. It’s a dish I would gladly make again for a weekend dinner.
If you enjoy crispy chicken or Japanese breaded cutlets such as tonkatsu, this easy Chicken Nanban recipe is a great way to try something different. The combination of golden fried chicken, sweet and tangy nanbanzu sauce, and homemade tartar sauce offers a flavorful alternative to ordinary fried chicken.
Using familiar ingredients like chicken thighs, eggs, flour, and mayonnaise, you can prepare this Miyazaki-style Japanese home-cooked dish for a family meal or a special weekend dinner.
If you found this recipe helpful, please save or bookmark it for later and share it with someone who enjoys Japanese home cooking.
I’ll continue sharing delicious, easy-to-follow recipes and practical cooking tips that you can use in your own kitchen. 😊
If there’s a Japanese dish you’ve been curious about or a recipe you’d like to see next, feel free to leave a comment. 😊
*Note: This recipe was inspired by a recipe featured on the YouTube channel ‘일식예보’. I prepared the dish myself and wrote this article based on my own cooking process and the final results.*